Learning Goal #5:
Demonstrates Professionalism and Effective Collaboration
-- Articulates a plan for their own continual professional development.
Group Projects
Final Project IT 580
While working on our Final Design Project in IT 580, I was paired with one of my classmates to develop a 3-part paper on Strategy, Scope and Structure of a webpage to complement the Early Childhood Center's Nature Explore Classroom. Here are our final documents:
- In the Strategy document, I added text and proof-read the work that my partner added.
- In the Scope document, in addition to adding text and proof-reading my partners work, I developed the ideas for the Absorb, Do, and Connect activities. I also created the storyboard graphics of the activities.
- In the Structure (or Design) document, in addition to adding text, proof-reading my partners work, I created the Information Architecture Design for the way our website would be presented to the user, and created the graphic to visually represent the web pages. I also created the Design Interface, including the text and the storyboard graphics for the interface.
We chose to use Wimba Live Classroom to communicate and Google Docs to create our shared document. We met 3-4 times a week on Wimba to suggest options and discuss changes for each document. In between meetings on Wimba, we used Google Docs to add and make changes to our project. We changed the color of the text as we added it to alert our partner of changes to the document. This sample document is a Word document that I exported from Google Docs for the purpose of an example. At the top I would list the next day and time we would meet on Wimba. This became necessary as we both forgot a pre-arranged meeting time. As we worked on the document, we would each list questions we had about the document that we wanted to cover during our next Wimba Live session.
This experience was one of the first truly collaborative projects that I have worked on where we both contributed the the overall project, rather than she works on one part and I work on another and we put the two part together. Our Wimba Live sessions were very helpful as we brainstormed what each section should contain, and how we would go about displaying it. Our Wimba Live sessions were usually short because we had already had the questions listed that we wanted to cover. Since we met often online, we both spent quality time working on the document as well as off line individually. I believe that this strategy worked best for both of us and lead to a quality document that we both created together.
IT 530 – Group Projects using Liquid Planner
In IT 530, each group simulated a project management type of atmosphere. Each group member was given a role such as project manager, instructional designer, client, and media production. The second project, in my opinion, was the only project that we had a real collaborative effort. I was one of two team managers. We worked together with the team instructional designer to develop a project proposal for our “client” and to communicate our expectations of the team (instructional designer and media production). We used Wimba to meet synchronously to assemble the proposal.
Assisting Classmates
Since much of the media and tools we use in this IT program I use on a daily basis, I found that I was most helpful to my classmates by sharing my knowledge of webpages and Photoshop with them.
File Structures in IT 486
In IT 486, several students struggled with uploading files to their website. Some did not understand how and where to upload the files. I used the following explanation on the file hierarchy of a webpage:
My posting from IT 486 discussion board:
“Someone suggested keeping all the files, html & pictures, in one location. I want to second that suggestion. I keep my web pages in a folder called "Webpages." Within that folder I created the index.html file and all the other files that I am linking too. I also created another folder for my images called "images." I like to keep all of my images in one folder, but you can keep them in the main folder of "Webpages" too. Folder hierarchy on my computer is:
You can create additional folders if necessary, but keep everything together in one folder. It makes it easier to FTP the files and the links will stay intact.”

My classmate responded:
“Thank you for your tips - they seem to be very helpful. I will save everything in one file as well, like you did. It surely will get more organized and easier to find my stuff.
I wanted to ask you a question - by what you wrote in your last message, I understand that when we FTP our index.html and the linked pages, we also have to FTP the pictures, videos, and everything else that is linked to the index.html?
I didn't ftp my pictures to my SIUE website together with my index.html - is that the reason why my pictures are not showing?”
My response:
“Like Justin said, you have to upload all your pictures and files AND in the same folder structure that you have them on your computer. If you have pictures in an "image" folder on your computer and the index page is linked to the folder but FTP them to the main folder along with the files, the links will not work.
In other words, if the file path to your images reads:
the "stl_99logo.jpg" file is in a folder "images."
If I upload those images so they are in the same folder as my index file, the web page is looking for the file "stl_99logo.jpg" in a folder "images" and not finding it there. That's why the link would be broken.”
This information is second nature to me, but to a beginner who has never created a webpage before needs specific information. As soon as she mentioned that her pictures were not “showing” up, I realized that she did not upload them. I also wanted her to understand that if her files are in a folder, the hierarchy has to be maintained or the links won’t work. This I have found out the hard way and wanted to help my classmates from making the same mistakes I made when I was a beginning web page designer.
PhotoShop in IT 596
While critiquing a classmates Photoshop images from IT 596, I wanted to let her in on a tip I learned when combining layers in an image. She chose to place an image of a bird on a dog’s nose. See picture to the right. The image consists of the background image of the dog and the front image of the bird. The bird is on a transparent background. The background of the original image of the bird had to be erased.
Here are my tips to her about erasing backgrounds:
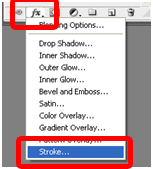
One trick I use to make sure I have everything erased is I add a red “stroke” around the image. The stoke will identify any areas that are not erased fully.
To add a stroke, hide the background image by clicking on the eye icon in the Layers panel to hide the background.
Then click layer you want to work on.
Click on the fx drop down box at the bottom of the Layers panel and select Stroke.
A Layer Style window will open. I accept the default color as red and the size of 3 px. Click OK.
You will get a red line around the image. Notice between the birds claws. Not everything got erased. Now you can take the erase tool and clean up the image even better. Zoom into the image as far as necessary and make your brush as small as you need to clean up the image.
The little that is left in this image blends into the background well, but sometimes it doesn’t so you need a little help finding leftover background that needs to be erased. This technique will help you identify un-erased areas especially around the edge of an image.
When you are finished, return to the Layers panel and erase the stroke effect by dragging the effect to the trash bin in the Layers panel.


I have done a lot of layers and erasing using Photoshop so I am able to pass these kinds of tips along to my classmates.
Check Points in IT 510In IT 510, four checkpoints were used to get feedback from our classmates on the progress of our final projects. I created a document that explained the use of a navigational chart in aviation. In my first checkpoint, one of my classmates noticed that I did not mention how I would do a needs analysis and why I chose that particular method. Because my classmate noticed that about my project, I was able to identify a similar missing step in another’s classmate’s project:
“Do they need the training materials because they don’t have adequate or frequent training or do they need the materials because they don’t have any materials or information at all? This distinction is important in my opinion because when you start writing directions, you would have to get more detailed in instructions if you have to explain a step from the beginning (no training at all) vs. less detail if the learner already knows some of the procedures, but just needs a refresher. Gerry pointed out a similar error in my project. Both of our projects (mine is a lesson in navigation using an aeronautical chart) have to do less with step by step instructions, and more in the knowledge to get the task completed.”
Classmate’s Jury Portfolio
I have kept in touch with a few of my classmates after classes are over. Paula Sterling and I met the very first day of the very first class when we started the program and have kept in touch ever since. She skipped a semester or two so I was a little of head of her by the time she reached her Jury 1. The following is an edited exchange (I edited out some of the “how are you?” and “Hope you are well” dialogue for brevity) when she asked my advice on preparing for the Jury 1.
Paula,
The link to my Jury 1 is: http://www.siue.edu/~lmillio/portfolio/ if you want to look at it. Sometimes it helps to have a sample to have a start. I had no idea where to start.Make five sections, each corresponding to the leaning goals in the rubric. Don’t worry about making your webpage fancy. I came across this new JavaScript that I wanted to try out, so I used it for my portfolio. Remember, keep it simple and concentrate on the message. Most of the comments I had from my committee was that I didn’t provide enough detail. I thought I was very detailed, but I guess not enough. J
If you don’t want to deal with making the web pages at all, you can use the Portfolio in Blackboard. Go to: http://www.siue.edu/its/bb/students/tutorials.shtml#portfolios for instructions. The portfolio wizard creates the pages for you and you add the content.
I would be happy to look your portfolio over when you get further along.
Laura”
I did not intend to have her copy my portfolio, but to see an example so she had someplace to start. Her advisor would give her more specifics when they talked, but it always has a good place to start. This exchanged took place December 2011.
Paula replied,
Do you think that I really have enough knowledge and material from only taking 3 classes to prepare for jury 1? I have taken IT486, IT500 and IT510 (all of them with you). And I see that you had also taken your EPFRs (probably all of them) plus the design studio class, and maybe another one or two. So, I see that you had substantially more material than I do… what do you think?
I replied to Paula,
“Between IT 486, IT 500 and IT510, you should have enough to do your Jury 1.
For Learning Goal #1: “Demonstrates understanding of various theories and concepts that inform the practice of instructional design and learning technologies (ID<),” you will be able to draw from IT 500 and IT510 extensively.
Same for Learning Goal #2: “Employs appropriate models for design and development of instruction, learning environments, and/or human performance improvement interventions.”
Learning Goal #3: “Demonstrates skills with various media and other tools typically used in the development and deployment of learning and/or performance improvement technologies” You should be able to draw heavily from IT486 and IT 510 (the Course Project, should help with this too).
Learning Goal #4: “Demonstrates Critical, Reflective and Metacognitve Thinking”: this section is how you have developed your thinking about ID and ISD, where you started and where you are now.
Learning Goal #5: “Demonstrates Professionalism and Effective Collaboration,” Go back and download discussion boards from IT 500 and IT 510 where we had to do a peer review or times you helped someone improve their project or ways that you added thoughts to a discussion.
Dave will go over a lot of this with you. Have your rubric handy so you can ask him to clarify any statements you don’t understand.”
I think it is very important to help out our classmates just starting the process we have already started. We are all in that position at one time or another and to just have a quick, friendly email exchange is important to calm anxieties.
In the Spring of 2012, I participated in the Spring Symposium and Paula brought up the advantage of seeing my portfolio as she started hers. Among the symposium participants, it was decided that anyone wishing to post their portfolio link on the Blackboard Instructional Design Program course. Several of us did. When I looked over my classmates portfolios, I noticed that Yvonne Russell had a section on Artifacts which I did not include in my portfolio. I thought this was a very important aspect of my program to include, so thanks to Yvonne’s portfolio, I include a section on artifacts in mine.
In the IT program
After posting my portfolio to the Instructional Technology Program Blackboard site, I received a response to my post:
Hi, Laura! Your portfolio looks great! I'd really like to use the web space on the siue website. How do I get started with this?
Any help you can give would be great. Feel free to email me at tshelto@siue.edu.
Thanks!
Tiffany Shelton
A lot of students do not realize that there is space on the SIUE servers to host personal webpages, nor do they know how to go about finding information. I responded to her posting with some information and the webpage resource:
Tiffany,
All SIUE students have 50MB of storage space for a personal webpage on the SIUE servers. Here is a resource that explains the personal webspace and how to upload files. http://www.siue.edu/web/personal_space.shtml.
Software like Dreamweaver and FrontPage will have the FTP (file transfer protocol) feture build in. You use the same information listed on the above web page for all FTP.
Host Name/Address: cougar.isg.siue.edu
Host Type: Automatic Detect
User ID: your e-id
Password: your e-id password
I know this material is covered in IT 486 but not all the students in the IT program that IT 486 and for those that do, may have forgotten the information needed. I hope that by posting this in the discussion board, others will read it and know that they have this as an option.
Continued Professional Development
I am fortunate that my job requires me to continue my professional development and provides me the resources to do that. IT 596 - Studio I has already given me the opportunity to explore aspects of software that I already use - Adobe Captivate. I was able to learn how to create an interactive tutorial where the learner is not a passive viewer but an active learner.
I will continue to attend conferences to advance my knowledge. Every year I attend the “Focus on Teaching and Technology Conference at UMSL. Workshops offer new and emerging technology experiences. In past workshops I have learned about new technologies or new ways of using current technologies. If is from a past workshop that I learned about the self-assessment feature in PowerPoint that I used in IT 597 and IT 430.
I also plan on attending the annual Educause Midwest Conference in the Spring of 2013. Educause is an organization of IT leaders and professionals that focuses on IT in higher education. Past Educause workshops have introduced new software like Captivate that I now use for tutorials and the introduction of mobile devises. I am excited about attending this year’s regional conference in Chicago.
SIUE subscribes to an online video seminar service called Magna Commons. These videos are created by professionals on critical issues facing faculty and technologists. The Online Teaching and Learning topics include subjects in online student engagement, technology and Web 2.0, syllabus & online course design and online grading and feedback. I have recently watched “Conventional Wisdom is Wrong: Five ways to Improve DE Quality.” One interesting take-away from that program was that a course rubric like Quality Matters is not enough to evaluate a course. You must evaluate the quality of the teaching and the learning to get an overall picture of the quality effect.
More constructively, I plan on being a more integral part in helping the ITS Instructional Design Unit create a program where we “certify” or “endorse” a faculty to teach online. Many colleges and universities have certification programs that faculty are required to attend in order to be allowed to teach online. SIUE does not have such a course or even policy but the Provost’s office is beginning to understand the need for some training. My final project for IT 540 will be a unit from such a course and I hope to make a self-paced course as my final Master’s Project. I have a short list of SIUE faculty planning to teach online in the summer that I hope to recruit as my test subjects. It’s my plan to use this self-paced course in conjunction with Instruction Design meetings and a peer evaluation as part of the overall plan to “certify” or “endorse” faculty here at SIUE.
I plan to achieve two things with my IT 598 project. First I would like to model for the participating faculty a well-designed course where the objectives are aligned with the assessments and a well-designed user interface assists in the teaching and learning process. Second, I would like the faculty to experience online learning for themselves as a student. Again, I would like to model well-designed, authentic activities that, as Adult Learners, the participating faculty will be able to use for their future online courses.
References:
Google Docs: http://docs.google.com
Educause Midwest: http://www.educause.edu/midwest-regional-conference
Focus on Teaching and Technology: http://www.umsl.edu/services/ctl/fttc.html
Magna Commons: http://www.magnapubs.com/
Million, Laura. (2011) Proj2Team2 proposal.docx